Contact Us

Questions? Comments? Concerns? Suggestions? Submissions? Shout-outs?

Whatever you want to tell us here at Mikey Does Cosplay, we're always happy to hear your thoughts and feedback!


123 Street Avenue, City Town, 99999

(123) 555-6789

email@address.com


You can set your address, phone number, email and site description in the settings tab.
Link to read me page with more information.

reflection.jpg

Blog

Here's where the magic happens. I'll be posting about all of my experiences and experiments (both failed and successful ones), introducing you to my costumes, sharing fun stories, linking tutorials and useful products, and who knows what else!


Pew Pew! Gotcha.

Michael MacWolff

Welcome back to more Pandemic Props with Mikey! So delighted to continue showing off the fun stuff I made during quarantine ^_^
Let’s get right to today’s feature, another gun (since guns and swords… and gunswords, seem to be my specialty) from AI: the Somnium Files. Which, if you haven’t played this game, it’s great and you should and I believe they announced a second game recently! The particular gun in question is Kaname Date’s “Evolver.”

One of the interesting things about this gun, is that it actually has two modes: one that looks like a classic snubnose pistol, and one that looks like scifi nonsense. Blessedly, I didn’t have to engineer a way for the but to transform, we just went with the fancier scifi version because it looks cooler, and has glowy bits!

For the most part, this was a fairly standandard build for me, using MDF as a base and building out with foam and some worbla details. The most interesting and challenging bit of course was the barrel with various glowing sections. Fortunately, the solution was fairly simple and I already had the materials to accomplish it! If you remember waaaay back in my prop career, I made a mashup sonic screwdriver/lightsaber. This one, to be exact.

While parsing out how to make this thing, I ordered a couple of lightsaber blades from Ultrasabers.com which work beautifully! Since I got a bit of a grab bag from them, I still had an extra blade laying around, with the thought that maybe I’d make myself a lightsaber some day… which of course never happened ¯\_(ツ)_/¯
On the bright side, I had a leftover lightsaber blade to use for other things… like the barrel of the Evolver!

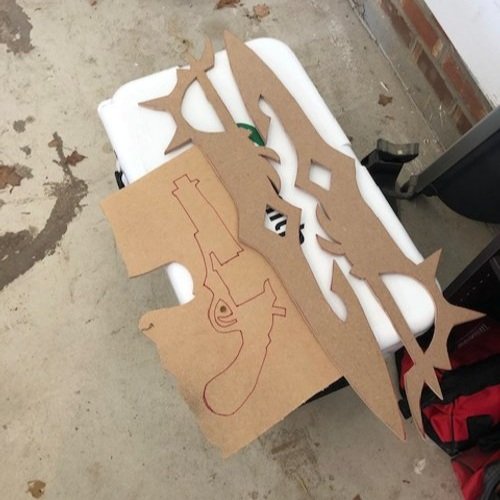
Here you can see the very skeleton of the gun, along with the barrel without any of its details, and the simple lighting setup I used. You can also see the giant empty space in the grip area that will eventually house the battery!
Since I only needed a select few spots on the barrel to actually glow, the rest of the details were built up from there to keep the light from showing through. It’s mostly craft foam, with a few small spots where I used puff paint to get some small details. There’s also a small section near the base that has worbla details too.

The barrel was definitely the most complicated part to detail, mostly because wrapping foam around round stuff is harder than you might think! Keeping things lined up and spaced correctly is a giant pain in the butt, and if you don’t measure and cut carefully, you’ll end up with weird gals. fortunately on this thing, I could easily hide most of my minor sins because any gaps were facing down, where the bottom strut of the gun frame would hide them!

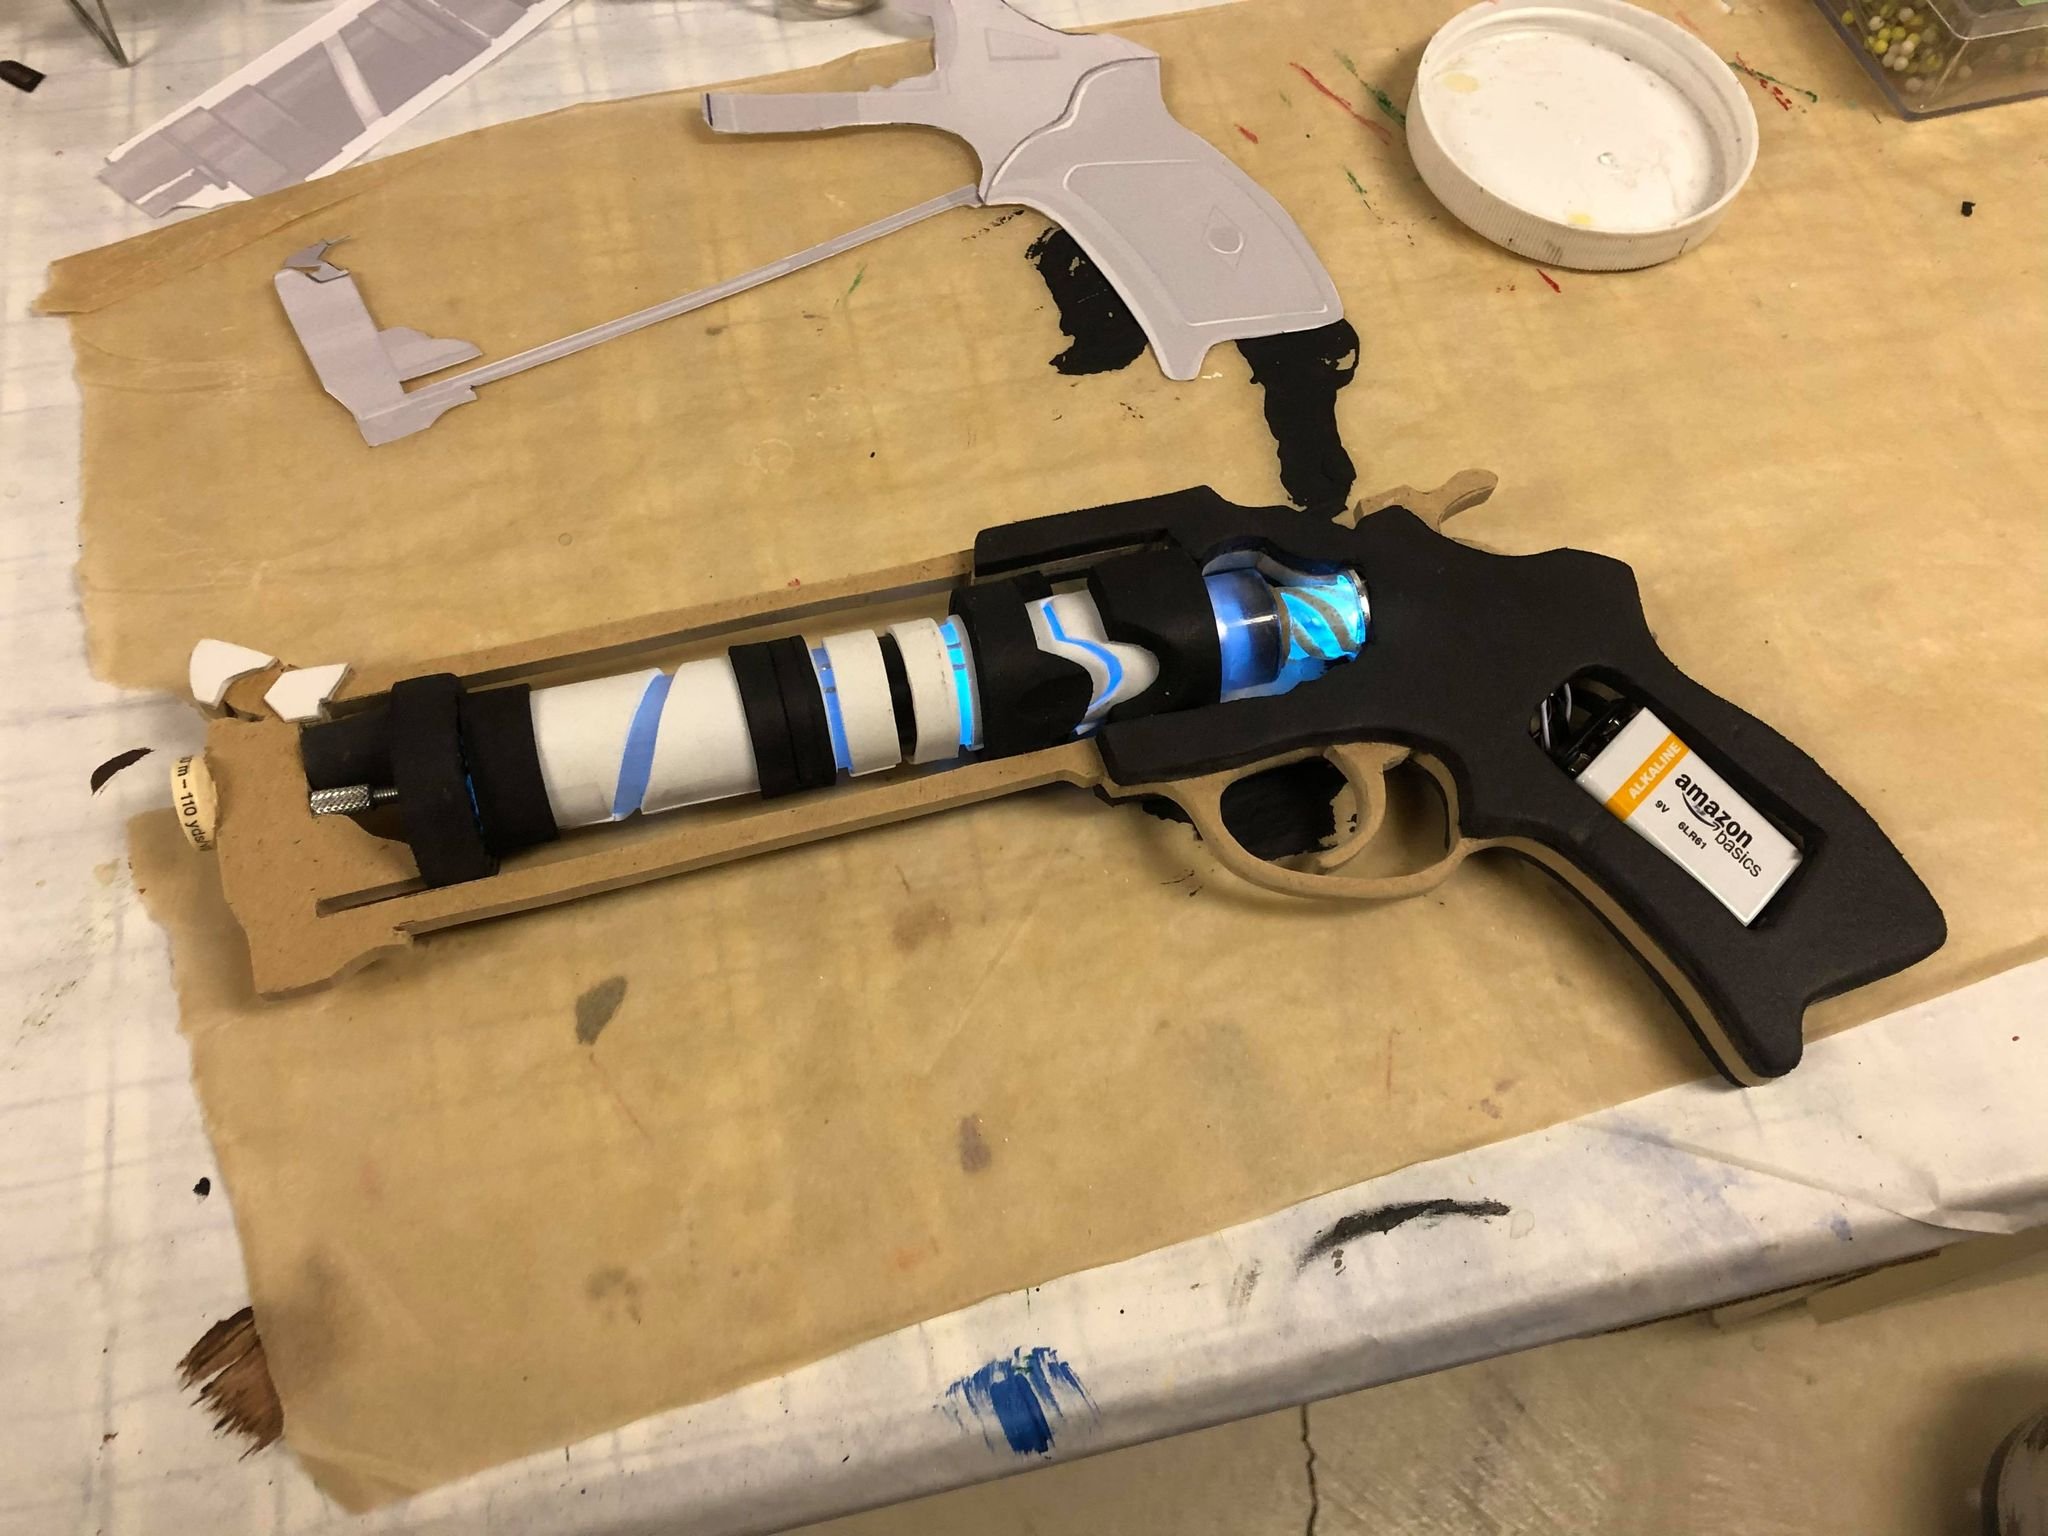
And now, with the light on! Since the wiring is threaded through the base of the gun, it needed to be installed as I was building out the frame’s foam details and as such, the lights were functional well before the gun was complete!
This is also a good moment to take a look at some of the weird junk I used in my construction! You knew there’d be at least some, because it wouldn’t be a Mikey prop if there weren’t at least one random piece of trash involved XD

There’s only two salvaged bits in this one, and they’re both at the front of the gun. The light blue should be fairly easy to identify if you do any sewing, particularly because of the “110 yds” printed on it. It’s the end of a small spool of Gutermann thread! The red bit might be trickier to place, but if you do any cross-stitching or embroidery, I guarantee you’ve used the thing I ripped that bit off of!

It’s actually the tightening screw on an embroidery hoop! It might seem like a weird choice, but the texture on the knob was perfect for that little detail, and since I do a lot of embroidery these days, I had plenty of hoops lying around that I could harvest one from.

The last relevant detail before I could start priming and painting was the panel to cover the battery well, which I made from foam and pressed paperboard (for rigidity and sturdiness) and used magnets to secure in place. I normally use velcro to hold these sorts of removable sections in place, but because the panel is so thin, the magnets were easier to use in this instance.

And with that done, we move on to priming and painting and having one beautiful piece of hardware!

This was definitely one of the most interesting guns I’ve had the privilege of making, and I even have an extra treat for all of you with this one. Since I’m friends with the new owner, and she actually has photos posted of her cosplay with the new gun, this is one of my few opportunities to share one of my commissions in the context of the cosplay it’s meant to go with!

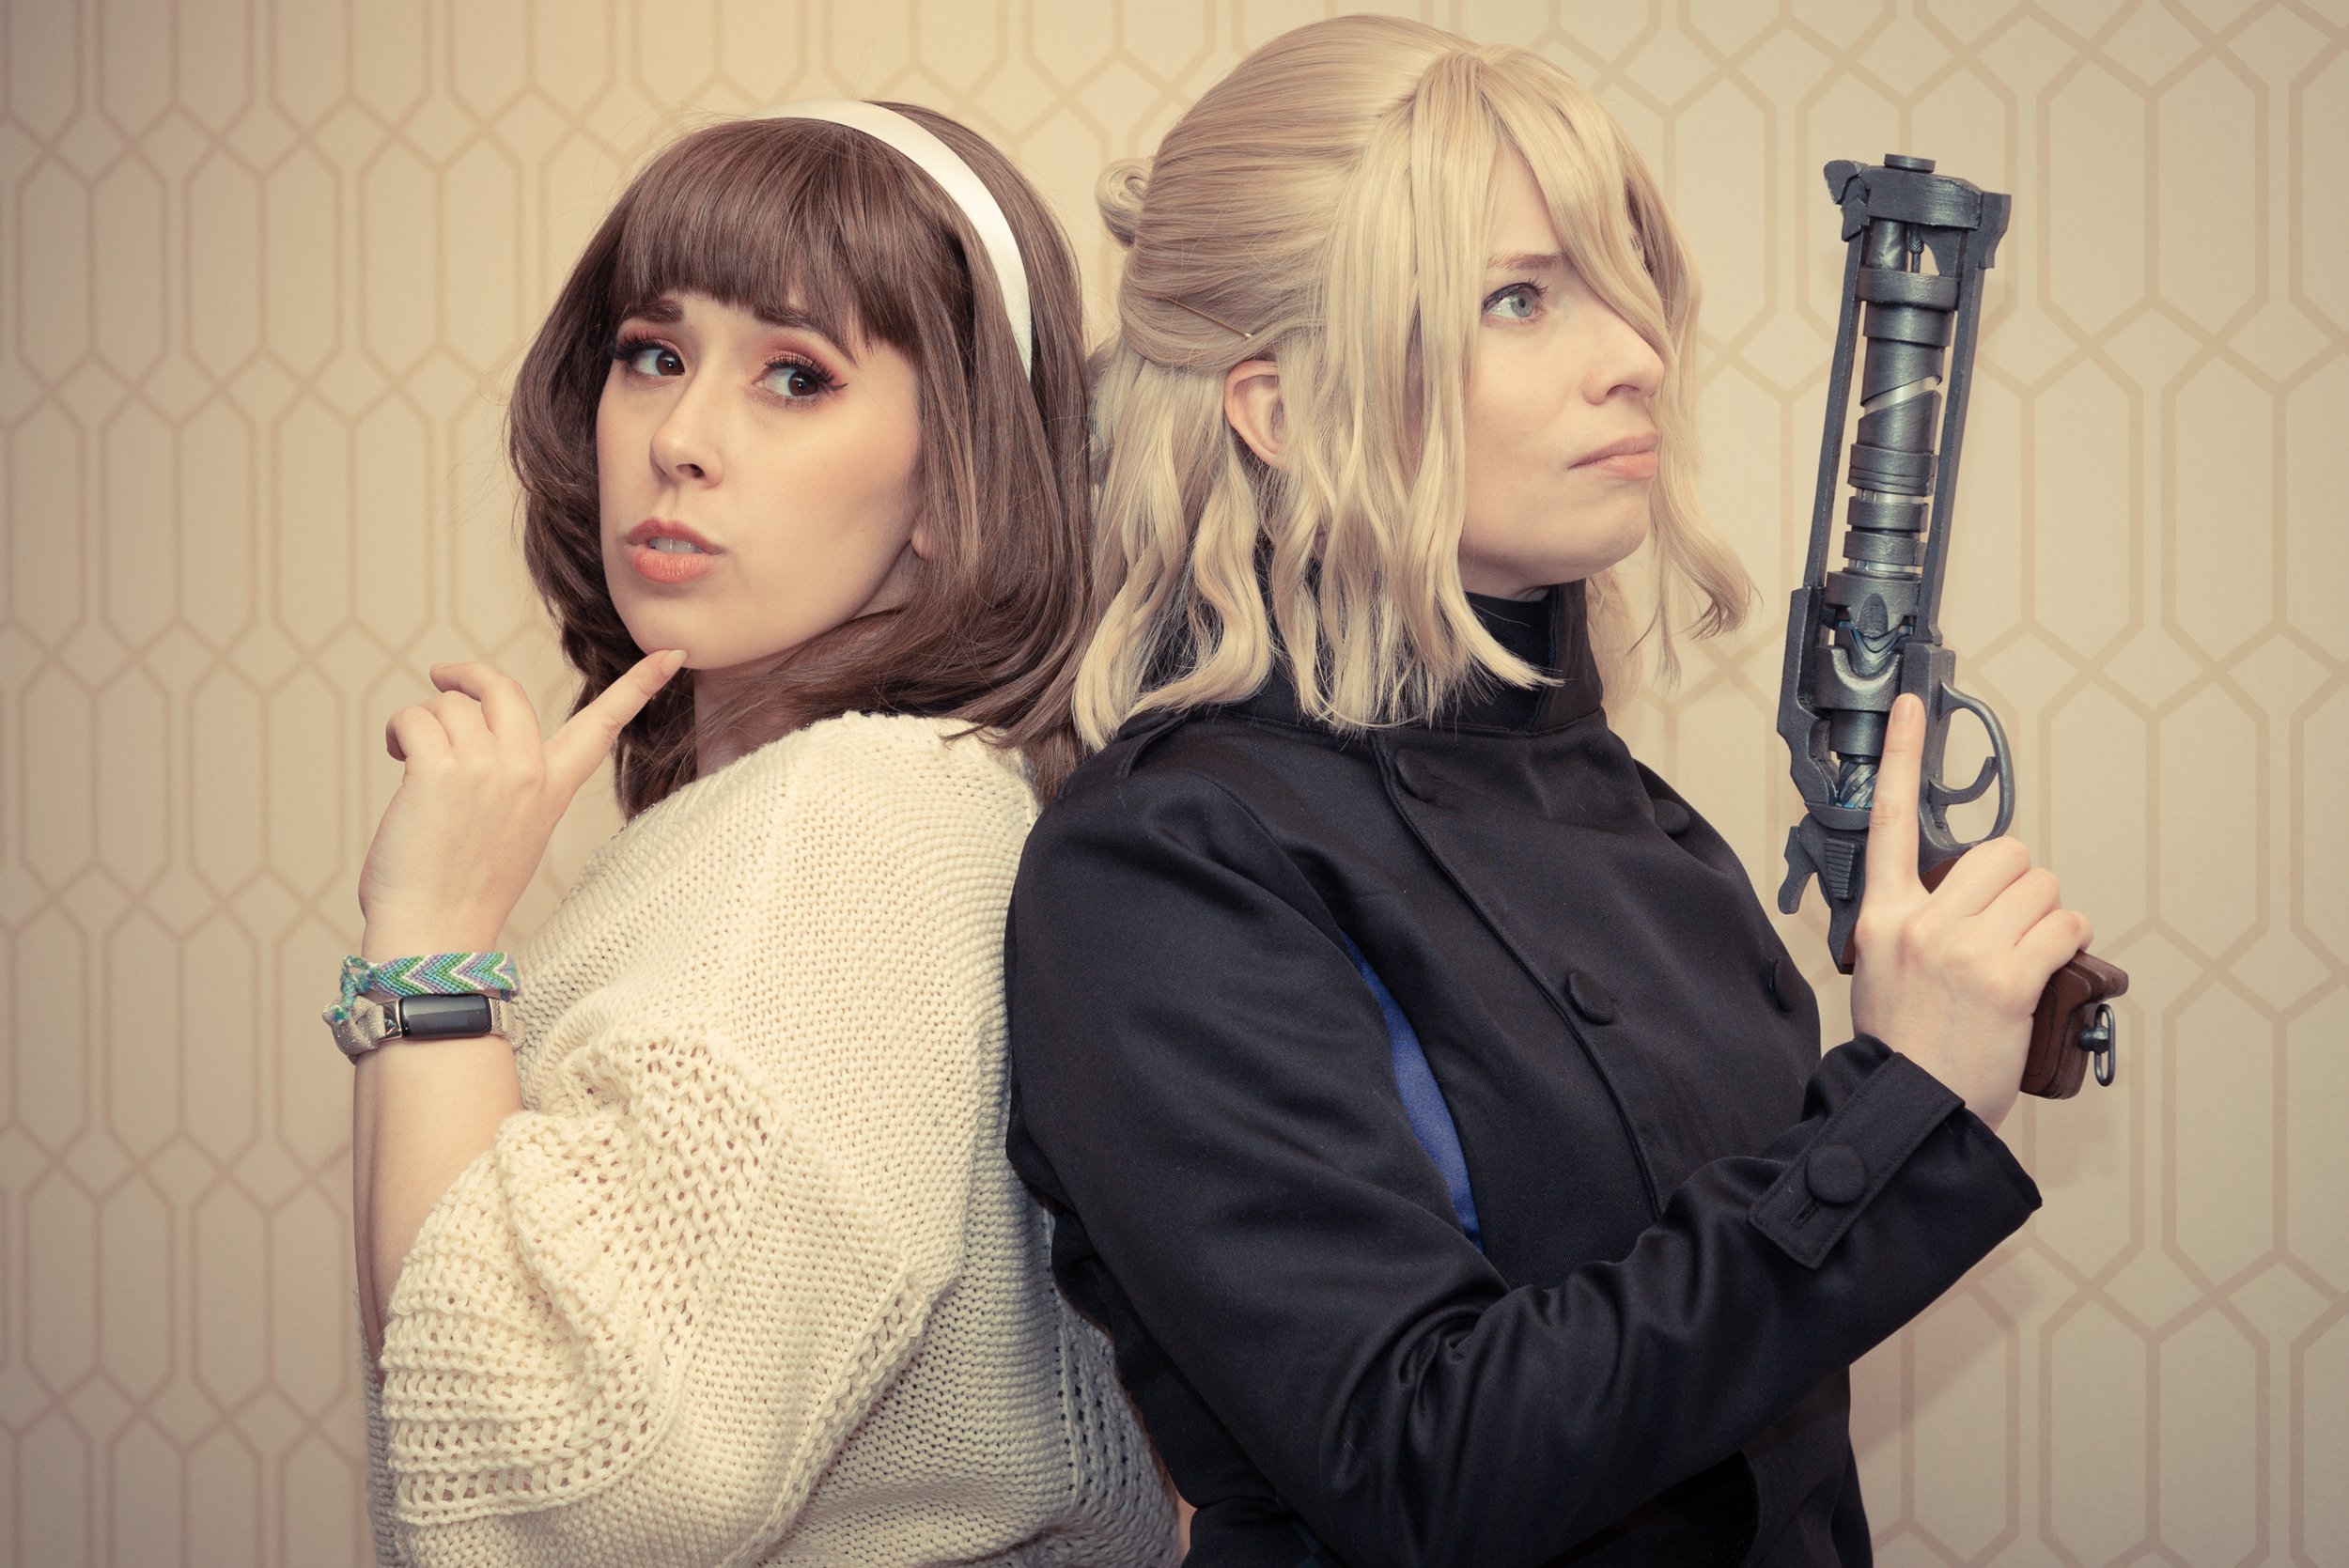
Feytaline looks amazing in her cosplay and I’m so glad one of my props got to be a part of it <3
Date’s wig was done by Ligerscout, the first photo was taken by Fey’s partner and edited by Feytaline herself! The second photo was taken by John Fascetti /FPS Photography, and the last two photos were taken by Iroun.Photos and feature Trickssi as Hitomi! All of these lovely folks are amazing and you should absolutely follow them on social media, I even made it easy for you by linking them to their names above so you have no excuse not to ;-P

That’s all for this round, but I still have plenty of props to catch up on so I’ll see you next time!

Water Blades & A Fancy Gun

Michael MacWolff

Welcome back to another catchup post for the props I’ve put together over the pandemic! This time around we’re looking at another Genshin Impact commission, though this time around the weapons in question were much smaller and simpler than the Wolf’s Gravestone. I’m referring to Tartaglia’s water blades!

These were a pretty standard build for me, with MDF at the core and foam layers to build out the details. Since this is a simple one, we’re also gonna take a look at a second prop that you can see the start of in here…

As per usual, now that we have some foam layers on there, it’s time for the dremel!

I also used some worbla scraps to help even things out in some places. There’s not really any other weird details or anything on these details, so most of the fun now comes with the painting!

These blades were made for HeckinSleepy, just like the Gravestone, so I got to complain to him about having to paint gradients again XD

After the several hours worth of painting between the two blades, and the clear coat at the end, we have two lovely, watery-looikin swords.

Since this was a quick build, let’s take a look at the second prop you got a sneak peek of in the first photo. This time, we’re looking at Herlock Sholme’s revolver from the Great Ace Attorney Chronicles (which I will definitely get around to playing at some point…)

Like the swords, the gun is also MDF at the core, but this time around there’s a lot more fun little details to worry about.

As for all of the parts, the barrel and the shells are wooden dowels, the cylinder is a slice of cardboard packing tube, and most of the smaller details like the flower shapes are made of pressed paperboard. There’s also a fair bit of worbla for the details, including the quarter-spheres that go behind cylinder, which are worbla over a chunk of foam stress ball… that’s right I’m back on my shit using random bits of trash in my props, but they really were the perfect size for this project and I already used the other half of the ball for something else ¯\_(ツ)_/¯

Here you can see all of the bits fit together and it’s already got a couple of coats of plasti-dip on it! Fun fact, the little round “pin” toward the top of the grip isn’t actually a separate piece. Since the grip has foam on it, I pressed the end of a paper straw into the foam and spun it around a bit to crease the shape into it. It works very well for rivets and the like when you’re working with foam.

With the structure finished, all that’s left is painting!

It’s been a while but if you remember my usual rule when it comes to painting: start with the colors that cover the worst, namely yellow, red, pink, white, and metallics. Also, undercoat your metallics with as similar a color as you can manage, in this case honey brown for the gold. The pastel-colored rounds would come next before i did the metallic top coat, but I don’t have another photo mid-paint so here’s the finished gun!

I didn’t mention earlier, but the pipe was also a part of the commission, but there wasn’t much to that guy. I started with a plastic pipe I bought off Amazon since I wanted to make sure my client could stick the end in their mouth without having to worry about damaging the piece or ending up with anything unpleasant in their mouth. Add some worbla rings and dome stickers, paint, and voila! Thankfully the pipe didn’t need to come apart and connect to the gun like the reference artwork shows.

That’s all for this week, come back soon where we’ll take a look at more of my backlog of pandemic props!

Pandemic Props!

Michael MacWolff

Well well, here we are again. To anyone who’s actually here seeing this, I’m delighted to have you back and also, it’s been a frankly embarrassingly long time since I’ve posted anything on here. I do plan to slowly add more to my cryptozoological field guide as I get new creatures assembled, but it will definitely no longer be a weekly endeavor; I do plan to keep to the Monday postings though so things will at least be consistent and mesh with my Instagram. In the meantime, however, I’m going to try to breathe at least some life back into my site here, which has gone untended long enough to probably be considered an archaeology project that this point lmao.
I hope all of you out there have been staying safe and healthy as the pandemic drags on. Blessedly Jordan and I have managed to avoid Covid thus far, and are very thankful that no one in our families has had any major complications with it.

Obviously with all that’s been going on, I haven’t been to any cons for the last couple of years, and consequently have done minimal cosplays, but as the slow start to more “normal” activity has been moving, I have had a few prop commissions that I’d love to share with everyone! So my plan is to post about a prop a week until I’ve made it through my backlog, and we’re going to start with a massive sword I made for my awesome friend HeckinSleepy!

Of the several commissions I’ve gotten since the pandemic began, Genshin has given me the most revenue. I can’t say I’m surprised given the game’s popularity, and how fantastic all of the designs are; I’m just amazed that I never fell into the trap lol. I did play some after getting several commission requests and thirsting over a lot of the designs and potential for fun cosplays to do but fortunately I had enough other stuff to distract me from getting in too deep. Anyway, one of the first Genshin props on my list was what turned out to be one of the largest swords I’ve ever made!

As with many of the Genshin stuff I’ve done, I was immediately filled with excitement to make something so impressive. That feeling was almost immediately replaced by dread and frustration as I tried to work out (1) what I was going to make it out of so as not to me insanely heavy, (2) the realization that I was going to have to light parts of it, and (3) the request that it separate somehow so that it would be easier to transport.

Because all of these things were intertwined, I had to think about them in tandem and work with HeckinSleepy to come pup with options he would be happy with. In the end, we decided the split made the most sense here:

Having the sword come apart at the base of the blade seemed like the best option for stability and functionality, and the design of the sword haad some built-in things that would help keep things together. It also meant that we could only light parts in the hilt, or else we’d need a second battery pack to power any of the bits in the blade itself, which we ultimately decided wasn’t worth the effort it would take to do that.

For materials, weight and stability were once again my primary concern; I knew using MDF for the base of the hilt was a no-brainer, but for the blade itself I ended up using large sheets of thick EVA foam (.25” I think….) so that it would be relatively lightweight and flexible enough to make joining and separating the pieces easier.

The only trouble with using EVA foam for the blade is that it needs structural support to not get floppy. So, first steps after cutting out the blade pieces were to dremel out a space for dowell rods and then glue the pieces together!

So, first things first, I made at least one mistake here: I didn’t put the reinforcing dowels all the way down toward the end, so it was still floppier than I wanted it to be, and in a rather crucial place! Later this would be reinforced by how the hilt pieces grip the blade section, but it was still concerning. My janky solution, because I didn’t want to have to pull the foam completely apart and potentially destroy it and need to start over altogether, was to take a metal ruler and shove it into the base so that it would help reinforce that section. Sadly I didn’t take a photo of that part because I was attempting to hide my sins, but the weird-ass improvisation runs strong in me XD
Now, if you look toward the base of the blade pieces, you might notice some additional channels there too. Those are going to help hold the blade in place when we stick it on the hilt.

And speaking of janky…

The rods that slide into those channels are absolutely some old wooden pencils I had lying around my craft room. It’s weird but they were the perfect size and shape for what I needed.
[This is why I never throw anything away, and consequently why I have entirely too much random shit in my craft room lmao]

As you can see there, we also have the MDF base for the sword hilt. I normally use .25” MDF for my swords and things, but this is .5” MDF. I went with the thicker stuff for several reasons: (1) the thickness of the blade meant the hilt would also need to be thicker than usual, (2) the thicker MDF is a lot sturdier, and heavier, so it counterbalances the weight of the blade better, and (3) I had a lot of other things I had to cram into/around the hilt base so the extra stability was key. They include channels for the wiring, a space for the battery (both of which you can see carved out in the photo), and the shafts for attaching the blade.

From this point, the hilt construction went more or less as-usual, with most of the details being added in as layers of foam sheeting, and eventually being dremeled into the proper bevels. I did, however, have to cast the translucent pieces where the lights were going.

The most relevant part in terms of the hilt construction is here, where the side details on the blade are actually a part of the hilt, and are what the blade section slides into. This keeps the blade stable by having points of contact on the inside of the blade (with the pencil shafts) as well as on the outside of the blade above and below. This isn’t foolproof and I still ended up adding industrial strength velcro to keep it from wiggling around too much, but it worked fairly well all things considered.

The details on the flat of the blade are actually slightly raised… mostly because I don’t trust myself to freehand a straight line, much less the 6 thin, parallel straight lines that run the length of the blade. I used a sheet of poster board, which I transferred the pattern to and then cut out with a craft knife. Also, as youo can see in the photo below, the side sections of the hilt which I described above were covered in a layer of warbla to make them rigid, since the foam on its own was not going to do that.

The well for the battery sits underneath the top grey portion, and so the separate piece that is sitting next to the hilt is the part that is removable to reach the battery. I unfortunately can’t find a photo of the battery housing from the other side such that you can actually see how it goes on, but it fits nicely over the red half-orb on the other side.
With all of the structural stuff done and tested, all that’s left was priming and painting (which you can already see starting to happen on some parts of the sword). The biggest pain in my ass was making a steady gradient from red to black… repeatedly. The gradient moves one direction up the base of the blade, and then the opposite direction on all those parallel lines I complained about earlier, which is yet another reason why I sure as heck wasn’t going to be freehanding those!

Despite being truly a beast of a project, I am insanely pleased with how this turned out, especially given the extra difficulties I had to incorporate (i.e. the lights and removable section). Here’s the finished sword in all its glory!

Since we skipped lighting any of the blade, I wanted to at least do something with the day-glow orange veins so I used neon paint such that they’d glow under UV/black light.

If you’re not already following HeckinSleepy, you totally should cause he’s an awesome dude. Also because he has a lot of props I’ve made so you’ll be able to see some of them out in the wild, and in the actual context of some beautiful cosplays!